
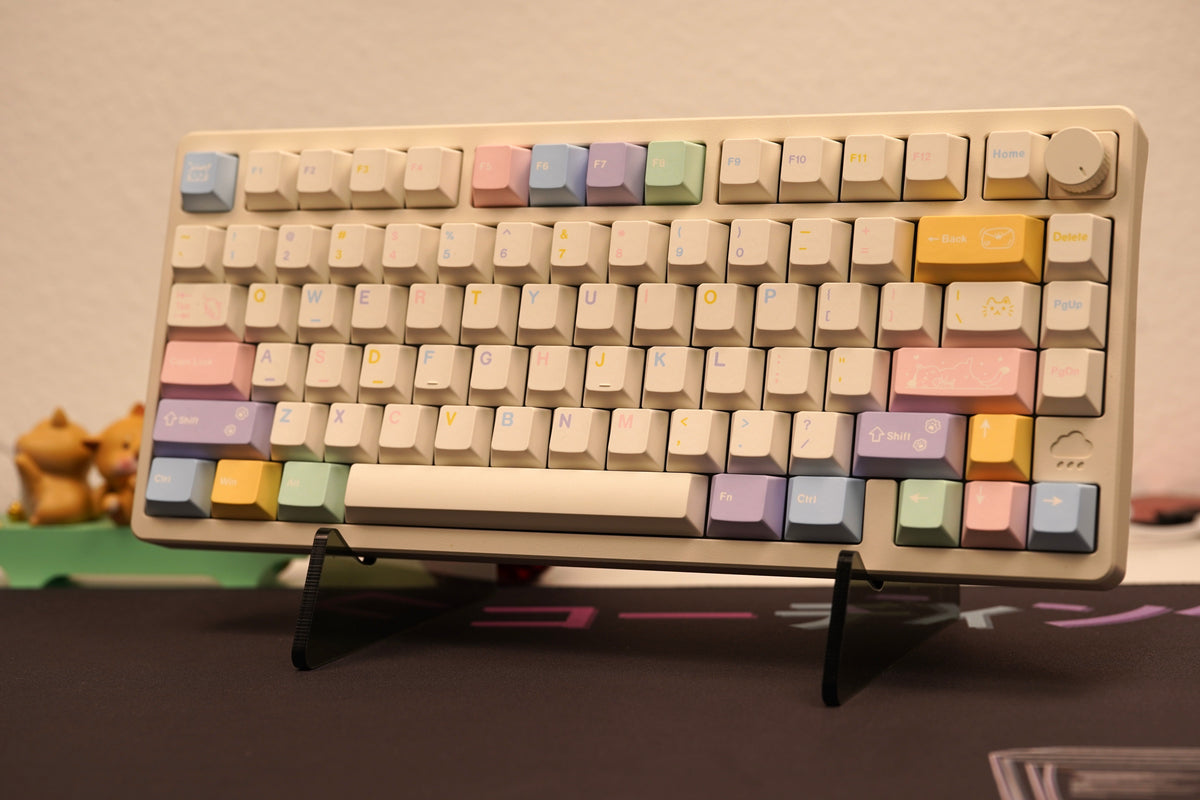
Wobkey Rainy75 V2 Review: 8K Polling, 10,000mAh Battery, Modular Design & More!
The original Wobkey Rainy75 completely changed the mechanical keyboard market. Before its release, getting an aluminum mechanical keyboard with this level of build quality and typing experience could easily cost $300 or more. Wobkey helped make premium aluminum keyboards much more accessible by offering an impressive package at a significantly lower price.
Now, Wobkey is back with the Rainy75 V2, bringing a number of meaningful upgrades while keeping the features that made the original so popular. From an upgraded 10,000mAh battery and 8,000Hz polling rate to a modular top-right corner, magnetic connections, and a redesigned case, there's quite a bit to explore.
In this review, we'll take a closer look at the Rainy75 V2, compare it with the original V1, explore its new features, and see how it performs in our typing sound comparisons.
1. Unboxing & Accessories
The first thing I noticed when opening the Rainy75 V2 was the improved packaging. Compared to the original Rainy75, Wobkey has added considerably more protective foam throughout the packaging. Even the manual has foam inside, which shows that they've put extra attention into protecting the keyboard during shipping. Aluminum keyboards can be quite heavy, so having this additional cushioning is definitely a good thing to make sure the keyboard arrives safely.

The packaging also includes the familiar plastic protective cover from the V1. Inside the box, you'll find the standard accessories:
-
USB cable
-
Keycap and switch puller
-
Extra switches
-
Additional silent rubber feet
-
Modular knob
One of the first things that caught my attention was the included knob. This is one of the new features of the Rainy75 V2, and we'll take a closer look at how it works below.
2. Rainy75 V2 vs. V1: Design & Build Quality
At first glance, the Rainy75 V2 feels very much like a Rainy75, but there are several noticeable design changes.
A New Metallic Finish
The V2 features a glittery metallic finish that catches the light beautifully. Compared to the smoother, more classic finish of the original V1, the new surface gives the keyboard a more eye-catching and premium appearance.

Interestingly, despite feeling quite heavy, the V2 is actually slightly lighter than the original V1 when comparing them on a scale.
|
Keyboard |
Weight |
|---|---|
|
Rainy75 V1 |
3.89 lbs |
|
Rainy75 V2 |
3.49 lbs |
|
Difference |
0.40 lbs lighter |


Updated Front Height & Typing Angle
One of the biggest changes is the keyboard's overall height and typing angle.

The V2 has a noticeably lower front height but a steeper typing angle.
Personally, I actually prefer the V2's ergonomics. Even though the typing angle is steeper on paper, it feels surprisingly natural when typing. The lower front height also makes a difference in how the keyboard feels on my desk.
This is one of those changes that's difficult to appreciate just by looking at product pictures. Once you actually put your hands on the keyboard, you can feel the difference.


Redesigned Side and Top Profile
Looking at the side of the keyboard, you'll also notice a more curved case design.
This type of curved CNC machining is more challenging to produce compared to the original's design, so I appreciate the additional attention to detail. On the top, Wobkey has also added a Rainy logo and a dedicated connection-mode button, making it easier to switch between wired, 2.4GHz, and Bluetooth connections.


3. Modular Top-Right Corner: Knob or Display Screen
One of my favorite new features of the Rainy75 V2 is its modular top-right corner. Instead of being limited to the standard keys, you can replace this section with a rotary knob or an optional display module.

Installing the Knob
The knob installation process is relatively simple. You just need to remove the regular keys in the top-right corner and insert the knob module. The side with three pins needs to align with the three-pin connection on the PCB, while the opposite side aligns with the two-pin connection.
When I first installed mine, I didn't push it in far enough, so the connection wasn't making proper contact and the knob didn't work. I recommend opening the top case when installing or changing the module. This makes the process much easier and allows you to make sure everything is properly seated.
Once fully installed, the knob works as expected. I also like its tactile feel. There's quite a bit of resistance and feedback when turning it, so it doesn't feel overly loose or easy to accidentally spin from one setting to another.
Optional Display Modules
The knob isn't the only option available.
According to Wobkey, you can also purchase separate display modules to replace the top-right section. I didn't receive the display modules with my review unit, so I wasn't able to test them myself. Having the choice between regular keys, a knob, or a display gives you more flexibility to personalize your setup.

4. Quick-Release Case & Magnetic Pogo-Pin Connection
Another major improvement is the new quick-release case design, which makes opening the Rainy75 V2 much easier. For anyone who enjoys modifying keyboards, this is a particularly useful upgrade.
The V2 uses a ball-catching structure, allowing you to access the internal components without dealing with the more traditional disassembly process.
Even better, the PCB connects to the rest of the assembly through magnetic pogo pins rather than traditional internal ribbon cables. We've seen similar approaches on newer keyboards like the Evo75 and Nut75.
I really like this design because opening a keyboard can sometimes be stressful, especially when you're worried about accidentally pulling or damaging an internal cable. With the magnetic connection, taking the keyboard apart and putting it back together feels much more convenient.

5. Multiple Layer Acoustic Structure
Inside the Rainy75 V2, Wobkey has included a six-layer acoustic structure with multiple layers of foam and sound-dampening materials. These materials help control unwanted noise and contribute to the keyboard's overall typing sound. The internal construction plays an important role in shaping the sound profile, and the V2 has quite a bit of acoustic material packed inside.

6. Massive 10,000mAh Battery
Battery capacity is another area where the Rainy75 V2 receives a significant upgrade. The new V2 comes with a massive 10,000mAh battery, which is considerably larger than the batteries found in the original Rainy75.
Here's how the different versions compare:
| Keyboard | Battery Capacity |
|---|---|
| Rainy75 V1 Standard | 3,500mAh |
| Rainy75 V1 Pro | 7,000mAh |
| Rainy75 V2 | 10,000mAh |
Compared to the standard V1, the V2 nearly triples the battery capacity. For people who frequently use their keyboards wirelessly, having a larger battery is definitely a welcome improvement.
Of course, actual battery life will depend on factors like RGB lighting, connection mode, and usage habits. But 10,000mAh is an impressive capacity to see in a mechanical keyboard.

7. Removable Magnetic Rear Weight & Receiver Storage
While taking apart the keyboard, I noticed another interesting feature underneath the case. There's a small gray button hidden beneath the internal foam. When pressed, it releases the mirror-finished rear weight. The rear weight is actually removable! It's attached magnetically, you can take it off and potentially replace it with another compatible weight featuring a different color or design.
There's another surprise underneath the removable rear weight: a dedicated storage compartment for the 2.4GHz USB receiver. Compared to the original Rainy75, where the receiver was simply included in the accessory box, the V2 gives you a dedicated place to store it inside the keyboard.
However, accessing it isn't particularly convenient. You can't simply push the receiver out from the back of the keyboard. To retrieve it, you actually need to open the top case, remove the PCB and foam, and then push it out.


8. 8K Polling Rate
One of the biggest technical upgrades on the Rainy75 V2 is its polling rate. The original Rainy75 supports a 1,000Hz polling rate, while the new V2 supports up to 8,000Hz. Even better, 8K polling is supported over both wired USB and 2.4GHz wireless connections.
But what exactly does 8K polling mean?
The polling rate determines how frequently a keyboard reports its inputs to your computer.
-
1,000Hz: Reports inputs 1,000 times per second.
-
8,000Hz: Reports inputs 8,000 times per second.
Does that mean the Rainy75 V2 is eight times faster than the original? Not exactly.
A higher polling rate reduces the potential delay between a keystroke and the keyboard reporting that input to your computer. However, actual input latency also depends on other factors, including your computer, monitor, and the rest of your system.
That said, when switching between the V1 and V2, I do notice that the V2 feels more responsive. We've also seen 8K polling on keyboards like the NUT75, so it's nice to see more mechanical keyboards bringing this feature to the market.
9. Tri-Mode Connectivity
Just like the original Rainy75, the V2 supports three different connection modes:
-
Wired USB
-
2.4GHz wireless
-
Bluetooth
This gives you the flexibility to use the keyboard across different devices and setups.
10. Keycaps, Switches & Plate Options
The Rainy75 V2 comes with 12 different configurations, giving buyers several options depending on their preferred typing feel and sound.


Keycaps
Depending on the configuration, the Rainy75 V2 comes with either translucent keycaps with top legends or blue-and-white dye-sublimated PBT keycaps with five-sided legends.
My review unit comes with the blue-and-white dye-sublimated PBT keycaps. The texture feels smooth and comfortable to type on, and I particularly like the cute decorative details. The blue-and-white color combination gives the keyboard a clean look, while the cat-themed elements add a little extra personality.
Switches
Wobkey offers different switch options for the Rainy75 V2, including the Cocoa V2 Mist and Mango V2 switches.
Cocoa V2 Mist Switch
-
Actuation force: 40g
-
Sound profile: Crisp
The Cocoa V2 Mist switches offer a lighter 40g force and a brighter, crisper typing sound.
Mango V2 Mist Switch or Mango V2 Pink Switch
-
Actuation force: 42g
-
Sound profile: Deep
Plate Options: PC vs. FR4
For the plate, Wobkey offers two options: PC and FR4.
The plate material can make quite a noticeable difference in the overall typing sound.
Here's how the combinations compare:
| Configuration | Sound Profile |
|---|---|
| PC Plate | Deeper, fuller, and more thocky |
| FR4 Plate | Higher-pitched and clackier |
If you prefer a deeper and fuller typing sound, I'd recommend looking at the Mango V2 switches paired with the PC plate.
On the other hand, if you enjoy a brighter, higher-pitched, and clackier sound, the Cocoa switches with the FR4 plate are worth considering.
11. Rainy75 V2 Sound Test & Comparison
Of course, no Rainy75 review would be complete without a typing sound test!
For this comparison, I tested the Rainy75 V2 with its Mango V2 switches and PC plate.
I also compared it against several other keyboards:
-
Wobkey Rainy75 V1
-
Evo75
-
RD75
Which sound profile do you prefer? Let us know in the comments!
12. Price & Final Thoughts: Is the Rainy75 V2 Worth It?
According to Wobkey, the Rainy75 V2 is expected to be priced similarly to the original V1, although the final pricing has not yet been announced.
Overall, I think Wobkey has made some pretty meaningful improvements with the Rainy75 V2. This isn't just a refreshed design with a few cosmetic changes. There are several upgrades that genuinely improve the keyboard's functionality and overall experience.
My favorite upgrades include:
-
The redesigned front height and typing angle
-
The modular top-right corner with optional knob and display modules
-
The quick-release case and magnetic pogo-pin connections
-
The upgraded 8,000Hz polling rate
-
The massive 10,000mAh battery
-
The removable magnetic rear weight
Should you upgrade from the original Rainy75?
If you already own the V1, I wouldn't say you absolutely need to upgrade. The original Rainy75 is still a great keyboard. However, if you're shopping for a new aluminum wireless mechanical keyboard and want features like 8K polling, a larger battery, and a modular design, the Rainy75 V2 is definitely worth considering.
Wobkey has taken an already popular keyboard and made several improvements without losing what made the original special. I'm excited to see how the Rainy75 V2 performs once more people get their hands on it.
What do you think about the new Rainy75 V2? Would you upgrade from the original, or are you happy sticking with the V1? Let us know in the comments!
Looking for your next mechanical keyboard?
At LumeKeebs, we carry a wide selection of mechanical keyboards, switches, keycaps, gaming mice, and accessories to help you build your perfect setup. Thanks for supporting us!
Share:
LumeKeebs Fremont Warehouse Moving Sale — In-Person Sale!